SSS… SSSSSSSSSSSSSSS…

I just thought I’d pop by to break the radio-silence and show some epic skin stuff that’s been happening lately.

A couple days ago, Brecht surprised us all by adding two additional falloff options for the SSS shader, as well as giving it bump/normal map capabilities and texture blurring, and Thomas also finished his work on SSS render passes (sneak a peak at the 2.69 release notes while we make them here)

The video above is an interesting combination of talent. Shortly after Brecht originally added the SSS shader, Matt Heimlich (a co-cycles module owner) created a monster node setup that mimics Arnold renderer’s renown skin shader abilities. A little while ago, Kent Trammell tried out Matt’s shader setup and that’s the video above :)

So I think it’s safe to say that the only major features missing from Cycles now is volumetrics (clouds and stuff). Sure there’s some other nice-to-have stuff, but if you think about it, nothing else is really a major feature (who cares about baking anyways)

DingTo Rocks!

I’ve been meaning to write this post since I started this blog, but my laziness isn’t a bad thing! (this time) Due to my procrastination, I now have more things to write about!

DingTo (Thomas Dinges) is one of the developers focused mainly on Cycles. He’s busy doing GSoC and has added a whole handful of great new features. Here’s a couple of my favorites:

Wavelength and Blackbody nodes

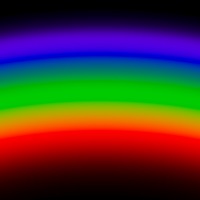
These two nodes allow you to input physical values to get a colour. The wavelength is the full spectrum of colours. Plug a gradient texture into it with a few math nodes to get the 0-1 range to a 380-780 range and you get a physically accurate rainbow!

wavelength


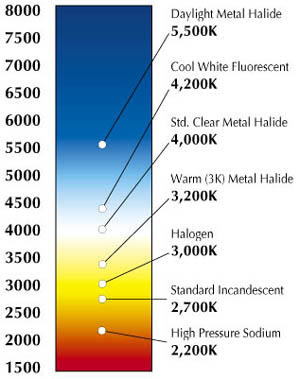
The Blackbody node on the other hand allows you to input a colour temperature to get the right RGB colour. This is useful if you know the exact colour temperature of a specific light bulb, or get that lame looking candle of yours to look right!

Separate/Combine HSV

I’ve been asking for this one for a damn long time ;) I asked DingTo for it at least a couple times and ranted about the lack of it at least once in #blendercoders.

Before all we had was Separate/Combine RGB, but many artists like myself don’t work in RGB much and can visualize colours much better as Hue (what colour), Saturation (the richness of the colour) and Value (brightness).

Why do we need this? Basically to make easier colour adjustments to textures. I generally use nodes as a sort of dynamic photoshopping in three dimensions, getting a bunch of unrelated textures (like rocks, grass and baked occlusion) to create a completely different material (like metal).

Non-Progressive Integrator for GPU

I’ve seen some good results from the non-progressive integrator, but since it was CPU-only I never really took it seriously since CPU rendering is too slow to work with.

Basically, instead of having one control for the number of samples to do, it gives you the ability to choose how many of what kind of sample to do for each iteration. So you can choose to have more diffuse samples than glossy since it usually takes less than 10 glossy samples to clean sharp reflections, but diffuse needs a lot more.

So depending on your scene and your setup, you’ll get cleaner renders in shorter time.

I haven’t tried it out fully yet, so I’ll leave any further elaboration to another post.

Ray Depth

The Ray Depth output of the Light Path node basically gives you control over what happens on each light bounce. You can use it on lamps to control the number of light bounces per lamp, or only have a single light bounce for transmission rays to eliminate that kind of caustics (though keeping reflection caustics). Or you could use it in materials, making a glossy material act like a diffuse one after a couple bounces so that it doesn’t give any fireflies but still adds a little colour bleeding. Use your imagination :)

The only downfall is that this is purely visual and doesn’t actually reduce render time at all. It might reduce some noise in the case of caustics, but it still calculates the same number of bounces for each ray even if you have the emission shader become a holdout shader after a few bounces. So use it for artistic purposes, not to optimize render time (unless in the caustics case).

Sky Model

sky

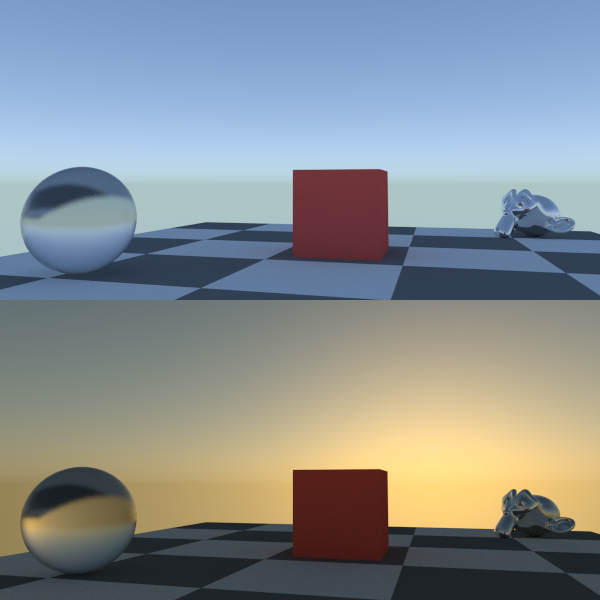
Added just yesterday, this is a much more realistic algorithm for the sky texture node, especially when it comes to sunsets.

All the features except the Sky Model are already in trunk, so get a build from graphicall.org or builder.blender.org  to use them :)

Here’s a full list of all DingTo’s GSoC awesomeness:
http://wiki.blender.org/index.php/User:DingTo/GSoC_2013/Changelog

Cycles changes license to accommodate for other 3D software

Good news posted today on the Blender Development Blog, the code for Cycles has been released with an Apache 2.0 license.

What does it mean?
Well basically it allows other 3D programs to use Cycles for rendering.

Why do we care?
More people using it means more potential developer involvement, which means more features, and more artists to provide professional feedback.

What will change?
Nothing bad.

“Note that Blender Foundation and Blender Institute remain committed to further developing Cycles as a render engine for Blender. We welcome other developers to integrate it in other applications, and especially to get involved with the Cycles development team at blender.org.” –src

Cycles will still remain as it is now, be developed just the same by the Blender devs, and probably gain additional improvements anyone makes for it outside of Blender context.

Read the full story on the Development blog:
http://code.blender.org/index.php/2013/08/cycles-render-engine-released-with-permissive-license/

OpenSurfaces

The folks at Cornell university have created a sort of platform for studying materials and textures, keeping it completely open for public contribution. It’s a big database of photos, but where contributors have isolated each material and inputted the various material properties as close as possible.

It looks a little too basic to be useful for any serious hyper-real material studies, but it’s a decent starting point for basic material properties such as diffuse and glossy intensities, roughness and colour.

OpenSurfaces
(Database download link is at the bottom, though the papers are the top are quite interesting)

Commonly Ignored Feature #7: Multiple Snapping Targets

It’s not an ignored feature, because it has to be the most well-hidden feature I’ve ever found. Seriously, whoever coded the snapping system must have completely forgotten to document this.

Yesterday afternoon in one of blender’s IRC channels hjaarnio mentioned this feature. It seemed that no one else knew of it’s existence – it wasn’t in the wiki and I couldn’t find any mention of it anywhere. This one is truly the Schrodinger’s cat of blender.

2013-08-10_21-09-55

While in snapping mode, when you have your mouse over a point to snap to, hit ‘A’ to mark that point. Then mark any other points you like and the selection will snap to the average of the marked points. It you want to give a certain point more weighting in that averaged location, just mark it more than once (as you can see in the end of that gif I mark the top right point a few times)

I’ve since updated the snapping page on the wiki.

This makes me think – what other strange and useful quirks lie out there beyond our exploration? What features have been painstakingly coded, only to have been forgotten forever? Probably quite a bit.

Gooseberry!

goose

I woke up late today, being Saturday, and lay in bed for about an hour aimlessly surfing the internet… when suddenly I see this on Google+ from Todd McIntosh.

I was out of bed before you could even say “Building BVH”!

This was shown at Siggraph apparently, but this is the first news I’ve heard since it was initially announced two years ago. I never doubted that Project Gooseberry would happen, but I never thought it would happen so soon. It’s kinda scary. Ever since receiving the nicest rejection letter I’ve ever had from Ton after applying for a position on the Tears of Steel team, it’s been my goal to learn as much as I can about shading and rendering so that one day I might work on one of the open movie projects.

I can only hope that I get to work on Gooseberry. And work my ass off of course.