Auto Tile Size Addon Updated

2013-09-29_11-29-27

[Download] [Documentation]

NOTE! An even newer version is available!

Just updated!

  • Removed ‘Set’ button – tile size is now automatically updated when changing target, render size or tile size (to manually change tile size, disable Auto Tile Size)
  • Improved accuracy for small tile sizes (result from 16 wasn’t so different from 32)

Remember to report any bugs and crashes or suggestions! Original post

2.69 Released (test build)

CyclesRelease269ColorTempCandles

2.69 hasn’t officially been released, but there is now a test build, which is practically the same thing (no new features will be added, only bug fixes)

Now before you run away shouting “It’s not the same!” remember that test builds are extremely important. They’re there for you to start using and report any bugs so that the official 2.69 release is mostly bug free. Otherwise we need to do an ‘a’ release. Last time, we nearly had to do a ‘b’ release too because even more bugs were found.

So do everyone a favour and just try it out. Render some old scenes, model something, or check your rigs still work.

If you’d like to see what’s new, check out the release notes (which are still being written in some parts). The Cycles release notes are done.


Low Light

low-light

The BA weekend challenge‘s theme this time was ‘low light’. It’s been a really really long time since I’ve entered one, but something put me in the mood on Saturday.

I only spent a couple hours on it on Saturday night, most of Sunday and Monday was for rendering (30 hours for the final image) since 100000 motion blurred rain particles can be pretty crazy. Sure there’s dozens of ways to speed that up, even comping a rainy image over it would probably look the same, but where’s the fun in that?!

Procedural Stylized Rock Modeling

rocks

Most of the stuff we do at my work is very stylized, which takes quite a bit of adjustment since I’m a realism nut. The only hard thing about the work I do there is getting simple things to look good. With my personal work it’s easy, just add detail and people love it! But learning to make simple things appealing is a very valuable skill, whether you like realism or not.

Lately I’ve been modeling lots of rocks and some terrain and I thought I’d share my workflow a bit.

Modeling a realistic rock is easy. Just subdivide the crap out of it and add a displacement modifier.

2013-04-27_23-30-44But stylizing them doesn’t really come natural to me.

So after half a day or so of playing, I came up with a pretty procedural solution.

rock_anim

  • Start out with an Icosphere so that we have uniform triangles.
  • Add a displacement modifier that uses global coordinates and RGB to XYZ displacement. This is so that we can just duplicate the object and get as many randomly shaped rocks as we like just by moving them around. Remember to choose “Color” mode in the cloud texture.
  • Add another displacement (this time just along the normals and local coordinates are fine) just to give some rough detail to the mesh. I also added a subsurf modifier at the top of the stack to get some more detail.
  • Add a Decimate modifier and reduce the collapse Ratio until you’ve killed all the topology. The more random the triangles appear, the better.
  • Now add another Decimate modifier, this time switch it to Planar mode and increase the angle to about 25 degrees. This is where that screwed up topology from the previous modifier is handy – a lack of any pattern or quads makes this Planar decimation produce some nice geometric shapes. Also check “All Boundaries” to make even better geometric shapes.
  • Finally add an Edge Split modifier (or a bevel if it’s for a close-up) and it’s done!

Remember that since we used global coordinates for the first displacement to get the main shape of the rock, we just need to move it (or use an array modifier) to get a differently shaped rock!

rock_var_anim

Rocks are easy though, cliffs and other sorts of terrain require a bit of manual labour.

However, I’m not a fan of manual labour and still have some procedural tricks up my sleeve!

Cue the knife tool.

knifed

I made some fairly random cuts both vertically and horizontally to create some slate-like bits, and hit ‘Z’ to enable ‘Cut Through’ mode of the knife tool. Do this a couple times and you’ll end up with some pretty scary topology. Which is a good thing. Then I hacked at it with Proportional Edit mode in linear falloff to skew some of the shelves.

Now just add the same modifiers as with the rocks (though go easy on the big displacement) and you get a nice stylized cliff face.cliff

Auto Tile Size Addon

Now before you start to think this is turning into some crazy coder blog, here’s an addon you might actually use!

2013-09-29_11-29-27

[Download] [Docs]

Tile sizes can be confusing and for some reason they actually make a difference in render speed! But why bother to figure it out when you can have a simple addon do it all for you?!
This addon takes care of that. Just enable it and you should never need to worry about tile sizes again!

It automatically calculates the best size when you change the resolution, or when you change from CPU to GPU and back, or accidentally change the tile size yourself! (although if you do want to set it manually, simply toggle the Auto Tile Size button)

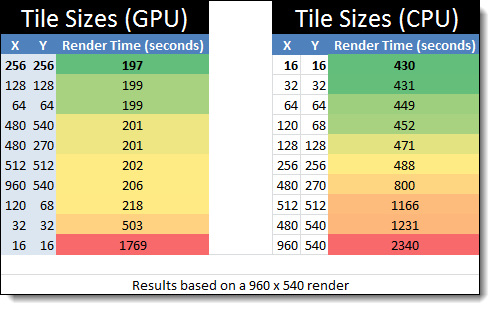
We’ve all seen Andrew’s old post about how tile sizes affect render time, but its not quite as simple as this:

blender_tile_sizes_chart2(Update: I’ve done my own extensive tests since posting this)

In fact, it’s not always a good idea to stick to powers of 2 for dimensions (32, 64, 256…). I know! Blasphemy! But in this case there’s some logic behind it. Or at least some proof.

If you always stick to powers of 2 for your tile sizes, you’ll often have tiles that are not all the same size (on the edges of the image) since most resolutions simply don’t divide cleanly into powers of 2 (1920×1080 is a good example)

1080ptiles

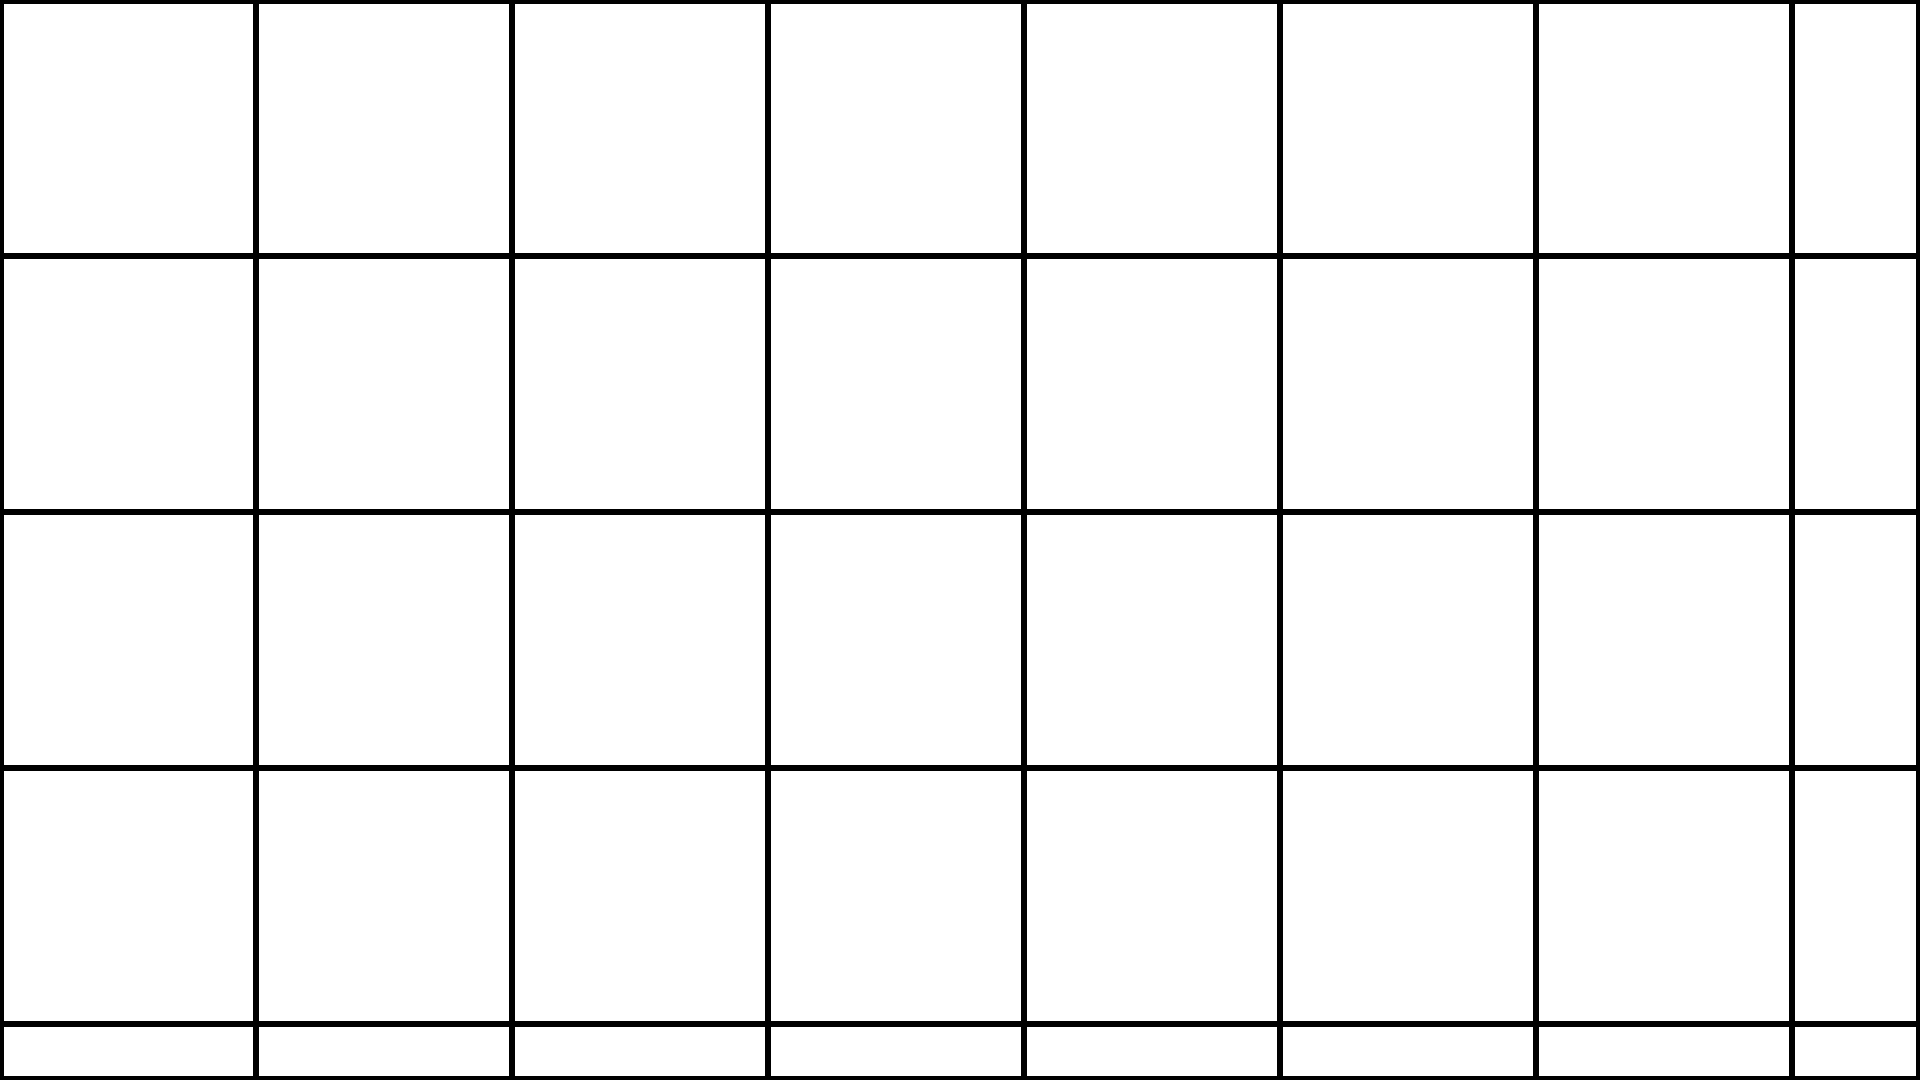
This is a 1080p image divided into 256×256 blocks. As you can see, the tiles on the right and bottom are not the same size as the others. You might think this is illogical, but these tiles don’t take a proportionate amount of time to render relative to their size. For example, the tiles on the right are about half the size of the rest of the tiles, but they take more than half the time to render.

Thus, it’s important to always keep all your tiles the same size and as square as possible. Being a few pixels skew from powers of 2 is not as big a deal as having inconsistent tiles.

That’s where this main purpose of this addon comes in.

It figures out what’s the best tile size closest to a power of 2 of your choice. For example, the best size for 1080p that’s closest to 256×256 is 240×270, making 8×4 consistently sized tiles

1080ptiles_right

The addon stores the chosen target size separately for CPU and GPU in case you want to switch often, and defaults to 32 square tiles for CPU and 256 for GPU. Those are the best sizes in my experience, though sometimes GPU does better with 128 and CPU better with 64 – it all depends on the scene and the resolution.

[Download]

Update v2.0:

Removed ‘Set’ button – tile size is now automatically updated when changing target, render size or tile size (to manually change tile size, disable Auto Tile Size)
Improved accuracy for small tile sizes (result from 16 wasn’t so different from 32)

Update v2.2:

Now works for BI, hidden target option behind a “Show Advanced” type button