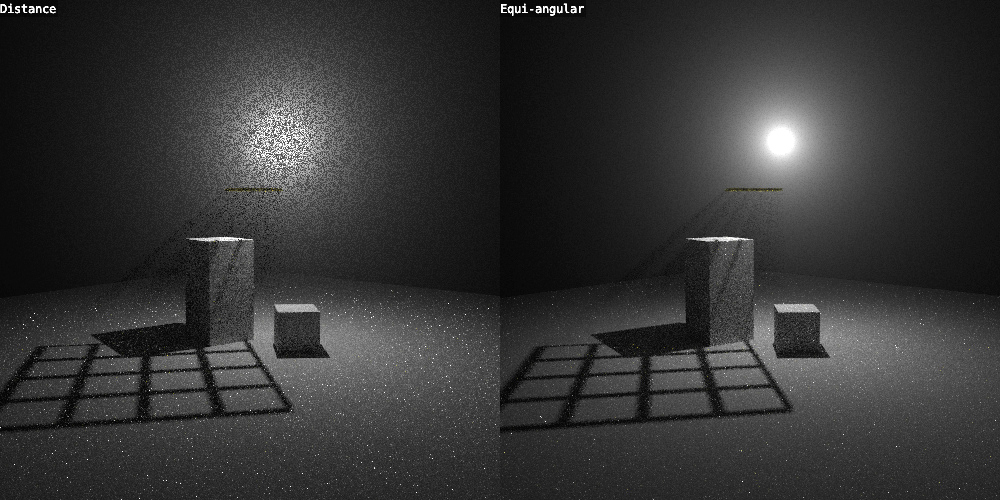
Equi-Angular Homogeneous Volume Sampling

equiangular

    This adds an option in the Volume Sampling panel, which helps rendering lamps inside or near volumes with less noise. It can also increase noise though and needs improvements to support MIS and heterogeneous volumes, but since it’s useful in some cases already (especially world volumes) it’s there now.
    Based on the code in the old branch by Stuart, with modifications by Thomas and Brecht.

-Brecht, commit

Thomas rendered the image above with just 10 samples! Cycles isn’t as slow as you thought ;)

How to Create Your Own HDR Environment Images

Download Free HDRI - lapaDownload Free HDRI - lapa

Download Free HDRI (2048×1024 - 6.6 MB)
Licensed CC0

Want more free HDRIs? Check out my new dedicated website: HDRI Haven


I searched long and hard for a way to create these magical images that light your scenes for you, and I never once found any article or mention of the process in any of the Blender forums. Every time I saw a render using image based lighting (IBL), the artist had always found it on some website (and was usually accompanied by a complaint about how Blender doesn’t give you nice hard shadows).

I’m no expert in this matter, but due to the lack of information that can be found easily, I’d like to share the little that I do know with you.

So in this guide I’ll show you the basics, but it’s up to you and the rest of the community to find out by experience what is good or bad practice and when to ignore everything you’ve ever been taught.

Continue Reading…

(Re)Introducing Node Wrangler!

01

Just one of the new features, Viewer node for Cycles materials

Version 1.0 was, lets face it, not particularly useful. In fact the only thing I still use from it occasionally is that auto-arrangement feature. However, since the Zoom-Fit function inspired Henrik Aarnio to include it in trunk with the Alt+Home key, it wasn’t completely useless at all.

In fact, I’ve secretly been working on a whole bucket-full of new features!

Get the Node Wrangler!

I’ve made a page specifically for this addon, and I’ll continue to update it as I add more features. Here’s a summary of the features as they stand right now (but check the page for the very latest):

  • Viewer node for Cycles materials (Ctrl+Shift+Click)
  • Delete unused nodes (Alt+X)
  • UV Layer nodes – add an attribute node from a list of available UV maps with the name field already filled in (Shift+A > Input > UV Maps > [map name])
  • Switch the type of one or more nodes to a related type, like a different shader (Alt+S), keeping inputs and outputs connected
  • Swap the output connections of two nodes (Alt+Shift+S)
  • Reset the compositor backdrop image zoom and position (Z)
  • Frame the selected nodes (Shift+P)
  • Reload the images of all the image nodes in the current tree (Alt+R)
  • Quickly jump to the Image Editor and view the image of the selected node. Works for textures, movie clips, environment images, render layers, viewer nodes and masks.
  • Automatically arrange the selected nodes (or all of them) in a non-overlapping linear layout (Q)

The todo list is public on GitHub, as is the changelog which is updated automatically as I commit changes and new features.

That page I mentioned earlier has a lot more info on each feature, including a gif showing their usage.

Auto Tile Size Addon

Now before you start to think this is turning into some crazy coder blog, here’s an addon you might actually use!

2013-09-29_11-29-27

[Download] [Docs]

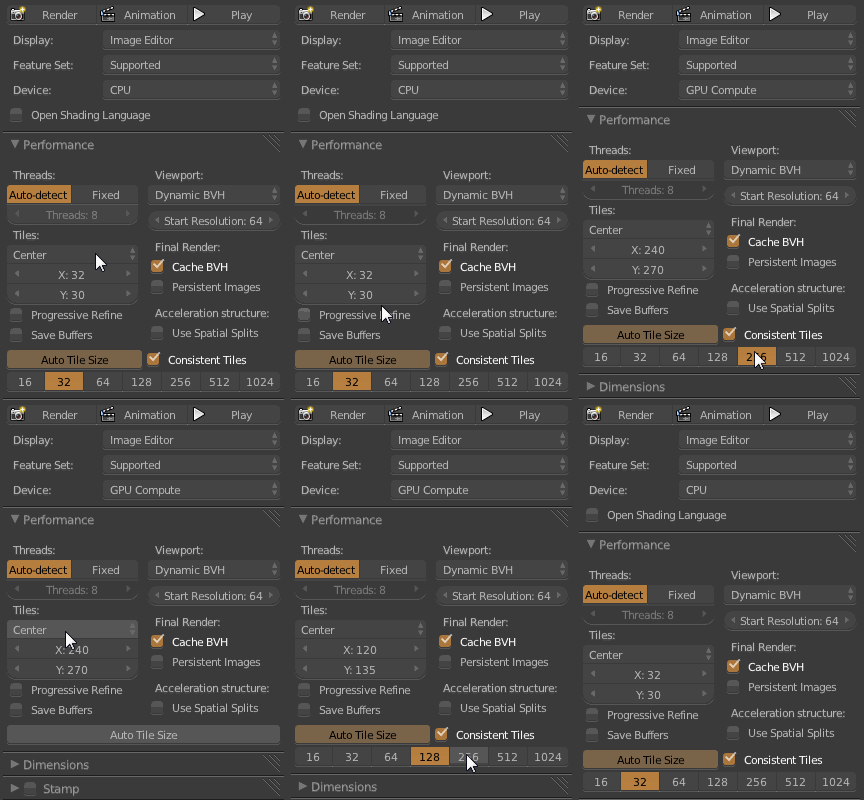
Tile sizes can be confusing and for some reason they actually make a difference in render speed! But why bother to figure it out when you can have a simple addon do it all for you?!
This addon takes care of that. Just enable it and you should never need to worry about tile sizes again!

It automatically calculates the best size when you change the resolution, or when you change from CPU to GPU and back, or accidentally change the tile size yourself! (although if you do want to set it manually, simply toggle the Auto Tile Size button)

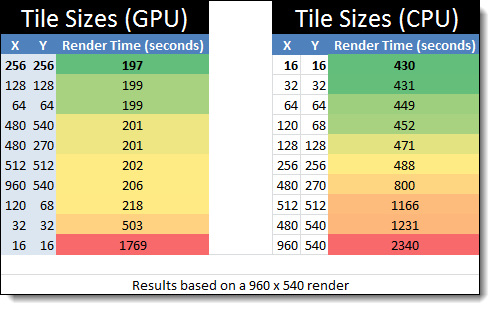
We’ve all seen Andrew’s old post about how tile sizes affect render time, but its not quite as simple as this:

blender_tile_sizes_chart2(Update: I’ve done my own extensive tests since posting this)

In fact, it’s not always a good idea to stick to powers of 2 for dimensions (32, 64, 256…). I know! Blasphemy! But in this case there’s some logic behind it. Or at least some proof.

If you always stick to powers of 2 for your tile sizes, you’ll often have tiles that are not all the same size (on the edges of the image) since most resolutions simply don’t divide cleanly into powers of 2 (1920×1080 is a good example)

1080ptiles

This is a 1080p image divided into 256×256 blocks. As you can see, the tiles on the right and bottom are not the same size as the others. You might think this is illogical, but these tiles don’t take a proportionate amount of time to render relative to their size. For example, the tiles on the right are about half the size of the rest of the tiles, but they take more than half the time to render.

Thus, it’s important to always keep all your tiles the same size and as square as possible. Being a few pixels skew from powers of 2 is not as big a deal as having inconsistent tiles.

That’s where this main purpose of this addon comes in.

It figures out what’s the best tile size closest to a power of 2 of your choice. For example, the best size for 1080p that’s closest to 256×256 is 240×270, making 8×4 consistently sized tiles

1080ptiles_right

The addon stores the chosen target size separately for CPU and GPU in case you want to switch often, and defaults to 32 square tiles for CPU and 256 for GPU. Those are the best sizes in my experience, though sometimes GPU does better with 128 and CPU better with 64 – it all depends on the scene and the resolution.

[Download]

Update v2.0:

Removed ‘Set’ button – tile size is now automatically updated when changing target, render size or tile size (to manually change tile size, disable Auto Tile Size)
Improved accuracy for small tile sizes (result from 16 wasn’t so different from 32)

Update v2.2:

Now works for BI, hidden target option behind a “Show Advanced” type button

DingTo Rocks!

I’ve been meaning to write this post since I started this blog, but my laziness isn’t a bad thing! (this time) Due to my procrastination, I now have more things to write about!

DingTo (Thomas Dinges) is one of the developers focused mainly on Cycles. He’s busy doing GSoC and has added a whole handful of great new features. Here’s a couple of my favorites:

Wavelength and Blackbody nodes

These two nodes allow you to input physical values to get a colour. The wavelength is the full spectrum of colours. Plug a gradient texture into it with a few math nodes to get the 0-1 range to a 380-780 range and you get a physically accurate rainbow!

wavelength


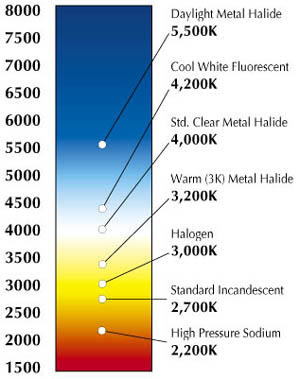
The Blackbody node on the other hand allows you to input a colour temperature to get the right RGB colour. This is useful if you know the exact colour temperature of a specific light bulb, or get that lame looking candle of yours to look right!

Separate/Combine HSV

I’ve been asking for this one for a damn long time ;) I asked DingTo for it at least a couple times and ranted about the lack of it at least once in #blendercoders.

Before all we had was Separate/Combine RGB, but many artists like myself don’t work in RGB much and can visualize colours much better as Hue (what colour), Saturation (the richness of the colour) and Value (brightness).

Why do we need this? Basically to make easier colour adjustments to textures. I generally use nodes as a sort of dynamic photoshopping in three dimensions, getting a bunch of unrelated textures (like rocks, grass and baked occlusion) to create a completely different material (like metal).

Non-Progressive Integrator for GPU

I’ve seen some good results from the non-progressive integrator, but since it was CPU-only I never really took it seriously since CPU rendering is too slow to work with.

Basically, instead of having one control for the number of samples to do, it gives you the ability to choose how many of what kind of sample to do for each iteration. So you can choose to have more diffuse samples than glossy since it usually takes less than 10 glossy samples to clean sharp reflections, but diffuse needs a lot more.

So depending on your scene and your setup, you’ll get cleaner renders in shorter time.

I haven’t tried it out fully yet, so I’ll leave any further elaboration to another post.

Ray Depth

The Ray Depth output of the Light Path node basically gives you control over what happens on each light bounce. You can use it on lamps to control the number of light bounces per lamp, or only have a single light bounce for transmission rays to eliminate that kind of caustics (though keeping reflection caustics). Or you could use it in materials, making a glossy material act like a diffuse one after a couple bounces so that it doesn’t give any fireflies but still adds a little colour bleeding. Use your imagination :)

The only downfall is that this is purely visual and doesn’t actually reduce render time at all. It might reduce some noise in the case of caustics, but it still calculates the same number of bounces for each ray even if you have the emission shader become a holdout shader after a few bounces. So use it for artistic purposes, not to optimize render time (unless in the caustics case).

Sky Model
sky

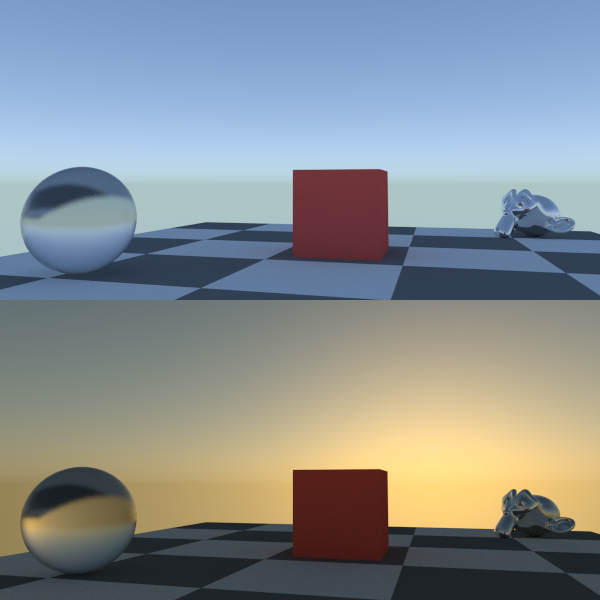
Added just yesterday, this is a much more realistic algorithm for the sky texture node, especially when it comes to sunsets.

All the features except the Sky Model are already in trunk, so get a build from graphicall.org or builder.blender.org  to use them :)
Here’s a full list of all DingTo’s GSoC awesomeness:
http://wiki.blender.org/index.php/User:DingTo/GSoC_2013/Changelog