ImageMagick is a really awesome little command line program that can be used for all sorts of image manipulation functions, like resizing a bunch of images at once or merging noisy renders into a clean one.
On Linux (and probably Mac) it’s super easy to install, just type:
sudo apt-get install imagemagick
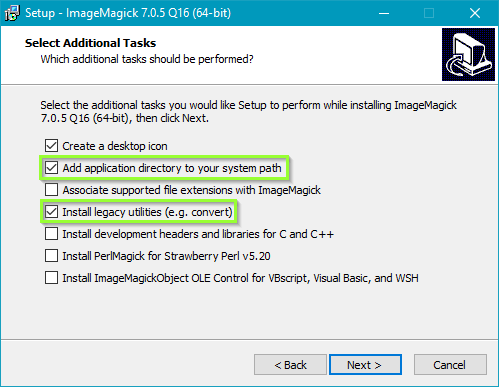
On Windows all you have to do is download it from the official site and make sure to check these two options during the installation:
- Add application directory to your system path – otherwise Windows won’t recognize any of the commands and tell you something like ‘convert’ is not recognized as an internal or external command, operable program or batch file.
- Install legacy utilities – for some reason the new version of ImageMagick got rid of the old convert and mogrify commands in favour of a single more confusing (imo) command. Checking this box will allow you to still use the old convert and mogrify commands.
Everything should be fine and dandy, but to verify that it’s installed properly, run one of the commands below in a terminal/command line:
identify someimage.jpg
convert someimage.jpg newimage.png
mogrify -resize 50 someimage.jpg
Replace someimage.jpg with any image you like, make sure to cd into a directory with images in it first, or replace the image name with a full path like “C:\foo\bar.png” (including quotes if there are spaces in the path).
If you get an error on Windows that says Invalid Parameter, that means Windows is confusing it with it’s own convert utility. This is easy to solve with of the solutions here.
That’s it! If you have any troubles with ImageMagick or the addon, post in the comments below and I’ll try to help you out.
Here’s a list of commands I frequently use:
Resize image to a maximum dimensions of 1024, maintaining aspect ratio:
convert img.jpg -resize 1024x1024 newimg.jpg
Like above but using sinecoz filter for better sharpness:
convert img.jpg -filter sinc -resize 1024x1024 newimg.jpg
Resize without interpolation:
convert img.jpg -scale 1024x1024 newimg.jpg
Resize all jpg images in current folder:
mogrify -filter sinc -resize 1024x1024 *.jpg
Convert PNG to JPG
convert img.jpg -quality 95 img.png
Recompress all JPG images to be really small
mogrify -strip -interlace Plane -gaussian-blur 0.05 -quality 85% *.jpg
Merge images (image stacking to reduce noise):
convert "path/to/images/*.png" -evaluate-sequence mean "path/to/images/merged_image.png"
Add label in image:
convert img.png -fill white -undercolor "#00000080" -gravity South -annotate +0+5 " some text! " new_img.png
Hey there. Followed the steps as shown but when i run the identify command i get ‘identify’ is not recognized as an internal or external command, operable program of batch file. I use Win7 64bit Ultimate
Same here; same OS.
Oh the embarrassment! Just restart your computer to actually register the Environment Variables.
Thanks for this! For me it was also needed to check “Install legacy utilities” option.
Ah yes, I think the newer version got rid of all the convert/mogrify/identify commands in favour of a combined ‘imagemagick’ command or something. The legacy utilities probably adds those back.